
How to Withdraw Funds From Payoneer to Your Bank Account
Turn your balance into usable cash by learning how to withdraw funds from Payoneer safely and efficiently to your bank account.


Payoneer offers several easy, quick, and low-cost ways to receive funds from global clients, and once you’ve done so, there are many ways you can use your earnings. Once of the most useful ways, though, is to withdraw your earnings, at any time, to your local bank account. After all, Payoneer connects with local banks in over 150 countries and territories!
So, if you already have funds in your account and want to know how to withdraw them to your local bank without any headaches, high fees and poor conversion rates, follow the simple instructions below:
How to withdraw money to your bank account
1. Sign in to Payoneer.
2. From the menu, go to Withdraw >> To Bank Account.
If you have not yet added a bank account to withdraw your funds to, you will see a page with guidelines on how to add a bank to your Payoneer account.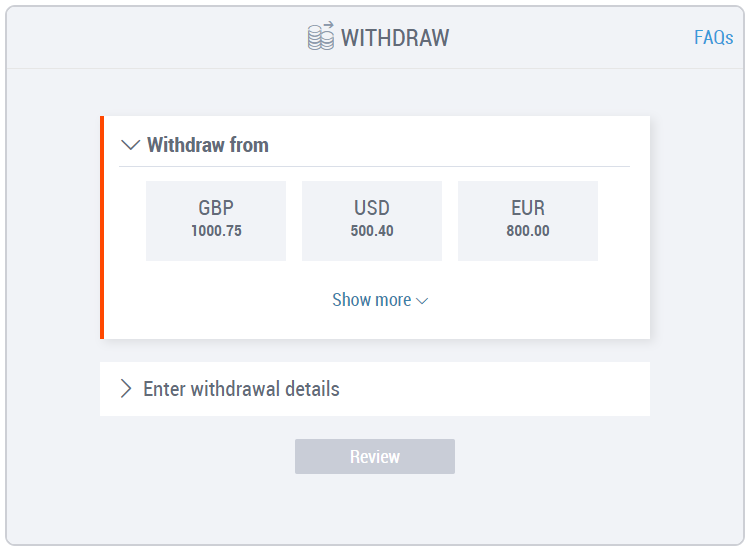
3. Select the currency balance or card you want to withdraw funds from.
4. Enter the withdrawal details, as displayed in the example below:
A. Select the bank account you want to withdraw funds to.
If you need to add a new bank account, click here or follow the instructions on the Bank Accounts tutorial.
B. Enter the amount you want to withdraw. Note your available balance, displayed at the top of the page.
C. If you like, enter a description of the withdrawal for your records. This is not a mandatory field.5. Click  . The withdrawal summary will then be displayed.
6. Review the details of your withdrawal and make sure everything is correct. If you need to change anything, click Edit and make the necessary changes.
7. After you’ve check that everything is correct, mark the checkbox ‘I approve this transaction’ and click  .
.
8. That’s it! You will receive an email confirmation after completing the withdrawal and your funds will be available in your account within 3-5 business days.
To check if the service is supported for your country, please click here. Please note that this service is subject to availability.
For more information, please read the FAQ in our Support Center.
Related resources

Discover Your All-In-One Ecommerce Payments Solution
Learn how eCommerce businesses can use Payoneer to receive marketplace payments, pay suppliers, manage multiple currencies, access working capital, and streamline global business payments.


Your Business Payments Are in Good Hands
Learn how to use Payoneer to receive payments from clients and marketplaces, access your funds, pay suppliers, manage currencies, and use additional tools that help simplify global business payments.

Avail the Most Trusted Payment Partner in India
Learn how businesses in India can use Payoneer to receive cross-border payments, withdraw earnings automatically, access Digital FIRCs, pay European VAT, and manage international business payments from one account.

Discover Payoneer’s Services for Your Business
Learn how to make the most of your Payoneer account, from receiving international payments and requesting payments from clients to withdrawing funds, paying suppliers, managing currencies, and accessing additional business…

How to Integrate Payoneer Checkout with Ueeshop
Learn how to integrate Payoneer Checkout with Ueeshop, configure your payment setup, and discover how to accept secure payments while supporting your cross-border ecommerce business.

How to Integrate Payoneer Checkout with WooCommerce
Learn how to integrate Payoneer Checkout with WooCommerce, configure your preferred checkout experience, and start accepting secure online payments through your WordPress store.

How to Integrate Payoneer Checkout with Shoplazza
Learn how to integrate Payoneer Checkout with Shoplazza, set up secure payment acceptance, and discover how a seamless checkout experience can support your online business.

How to Integrate Payoneer Checkout with Shopify
Learn how to integrate Payoneer Checkout with Shopify, set up secure online payments, and discover how a streamlined checkout experience can support your ecommerce growth.

How to Integrate Payoneer Checkout with Shopline
Learn how to integrate Payoneer Checkout with Shopline, set up your payment solution, and discover how it helps you accept secure payments and deliver a better checkout experience for customers.
Latest articles
-

Discover Your All-In-One Ecommerce Payments Solution
Learn how eCommerce businesses can use Payoneer to receive marketplace payments, pay suppliers, manage multiple currencies, access working capital, and streamline global business payments.
-
Your Business Payments Are in Good Hands
Learn how to use Payoneer to receive payments from clients and marketplaces, access your funds, pay suppliers, manage currencies, and use additional tools that help simplify global business payments.
-
Avail the Most Trusted Payment Partner in India
Learn how businesses in India can use Payoneer to receive cross-border payments, withdraw earnings automatically, access Digital FIRCs, pay European VAT, and manage international business payments from one account.
-
Discover Payoneer’s Services for Your Business
Learn how to make the most of your Payoneer account, from receiving international payments and requesting payments from clients to withdrawing funds, paying suppliers, managing currencies, and accessing additional business tools.
-
How to Integrate Payoneer Checkout with Ueeshop
Learn how to integrate Payoneer Checkout with Ueeshop, configure your payment setup, and discover how to accept secure payments while supporting your cross-border ecommerce business.
-
How to Integrate Payoneer Checkout with WooCommerce
Learn how to integrate Payoneer Checkout with WooCommerce, configure your preferred checkout experience, and start accepting secure online payments through your WordPress store.






Disclaimer
The information in this article/on this page is intended for marketing and informational purposes only and does not constitute legal, financial, tax, or professional advice in any context. Payoneer and Payoneer Workforce Management are not liable for the accuracy, completeness or reliability of the information provided herein. Any opinions expressed are those of the individual author and may not reflect the views of Payoneer or Payoneer Workforce Management. All representations and warranties regarding the information presented are disclaimed. The information in this article/on this page reflects the details available at the time of publication. For the most up-to-date information, please consult a Payoneer and/or Payoneer Workforce Management representative or account executive.
Availability of cards and other products is subject to customer’s eligibility. Not all products are available in all jurisdictions in the same manner. Nothing herein should be understood as solicitation outside the jurisdiction where Payoneer Inc. or its affiliates is licensed to engage in payment services, unless permitted by applicable laws. Depending on or your eligibility, you may be offered the Corporate Purchasing Mastercard, issued by First Century Bank, N.A., under a license by Mastercard® and provided to you by Payoneer Inc., or the Payoneer Business Premium Debit Mastercard®, issued and provided from Ireland by Payoneer Europe Limited under a license by Mastercard®.
Skuad Pte Limited (a Payoneer group company) and its affiliates & subsidiaries provide EoR, AoR, and contractor management services.
